
On my last Adepticon Prep post, I talked about the two fleet lists I worked up for the Schaumberg Prime offensive Firestorm Armada event. I got the chance to try out the first list, which contained a battleship and a carrier, with less than spectacular results. So it’s back to the drawing board!

The Bench
First of all, it is probably worth covering what other models I’ve got available to use in making up a new list. For brevity’s sake, I’m only including models that don’t appear in either the original lost or the revised one further on. Keep in mind, these are just the Kurak Alliance ships I’ve got:
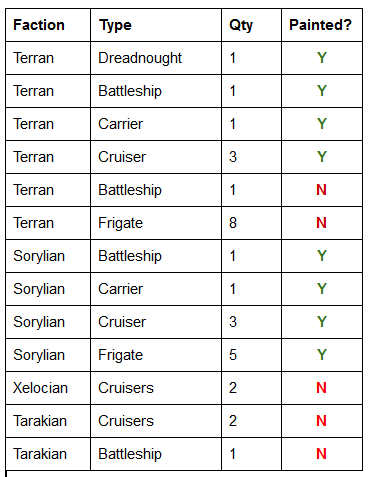 As you can see, it’s sort of a mixed bag. There isn’t a whole lot of stuff I can bring in at full squadron strength outside of my Terrans. Complicating matters is my limited painting time; while I’m fine painting up the models listed above, I’m not planning on buying anything new. I’d rather not pile a big new painting project on top of everything else at this stage!
The First Attempt
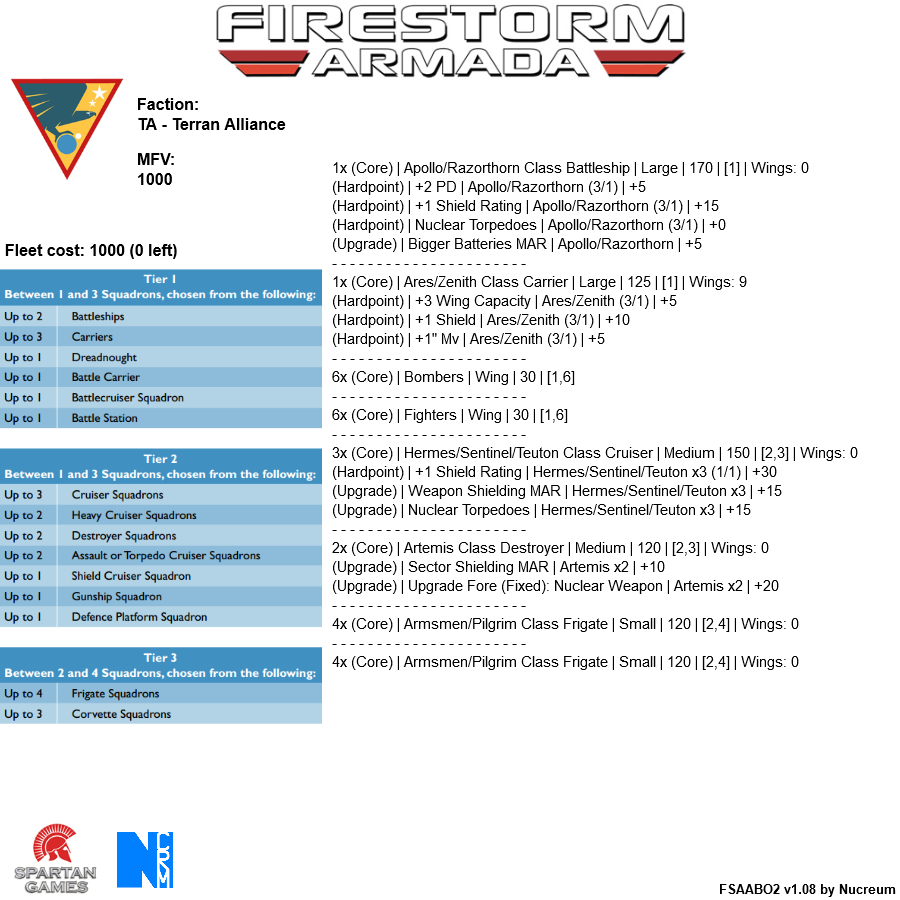
As a reminder, here is what the old list looked like:
My original Concept of Operations (CONOPS) for this list was to have the entire fleet hang back and use it’s long range torpedoes to whittle down the enemy as it closed, and then move in for the kill. Thanks to the crazy PD that Interceptors generate, however, I’ve discarded that CONOPS in favor of a new one.
New CONOPS
For my second attempt, my thought process is that I will shunt in part of my fleet and deploy the rest on the table. The shunting portion will be specialized for close in fighting and take upgrades and and hard points that either boost their close in firepower (like beam weapons) or boost their survivability (like shields and HP). The portion deploying on the table will be focused on survivability upgrades, but offensive upgrades will be more limited to conserve points. I’m going to go step by step and look at each element of the list, how it performed, and what changes I’m looking to make in light of this new CONOPS.
The Battleship
Given its firepower and points cost, the BB was clearly one of the linchpins of my list. Unfortunately, it was whittled down by long range fire as it tried to cross the board, even with an extra shield. So, the lesson seems to be that I can’t rely on shields to allow the Apollo to get within optimal weapons range. That leads me to thoughts of shunt-entry for the thing. Deploying it that way, I tend to think I need to re-think the upgrades on it. Taking the Beam Weapons upgrade would make more sense than the extra PD upgrade, I think. Escorts seem like better way to punch up the PD of the battleship. Intercepters would be best, of course, but I do not plan on shunting in the carrier and there is no other way to get the BB some wing support. The +1 shield would still be useful, though.
The Carrier
I think my carrier build was pretty solid, though I’m contemplating swamping out the extra movement for another shield. In that case, I would be trying to keep the carrier in cover more and using the air wing to support the rest of the fleet. Speaking of the wings, I’m definitely taking at least one wing of interceptors next time, that’s for sure! I might keep the bombers though, just for the extra “oomph” on offense. This time around, I’m going to use the bulk of the points I earned back by deleting the DDs to buy some shield cruisers to accompany the CV. The shield cruisers have some nice synergy with the carrier when it comes to their weapons, plus they will up the survivability of the rest of the fleet that will also be clustering around the CV.
The Cruisers
These guys were probably my most effective unit during the game, though that might just be because my opponent focused on my large ships first! However, once Ryjak got around to them, they didn’t last long. That reminder of their fragility has me contemplating using a shunt entry for them as well. In that case, their loadout isn’t all that optimized. I will drop the sector shielding, since if they shunt in they will be taking fire from multiple directions most likely. +1 HP could come in handy, though. I will probably drop the nukes, since they would be too close to employ the torps well. Weapons Shielding is still useful though, and the Beam Weapon upgrade becomes attractive.
The Destroyers
I generally liked how these guys worked. Once I figured out their MARs, I felt I was able to employ them well. However, the fact that I took them as an under-strength squadron hurt their AD output, and I’m not confident I will be able to get another DD and get it painted before Adepticon. So, I’m looking at dropping this squadron all together.
The Frigates
These guys did OK. The problem they faced is that Ryjak’s fleet was designed to counter their primary weapon system, their torpedoes. I am actually going to add in another squadron, as that will allow me even more flexibility with deployment and objectives in some of the scenarios.
Revised List
Here is my crack at a revised version of the list from earlier:

As you can see, the big changes are that I dropped the DDs, adjusted the upgrades and hardpoints, added another squadron of FFs, escorts for the BB, and shield cruisers to accompany the CV. I’m looking forward to trying this one out!
Until next time…
Pingback: Adepticon Prep: Firestorm Armada Fleet Lists Round 3 | Man Battlestations Blog
Pingback: Adepticon Prep: Battlefleet Gothic List Building | Man Battlestations Blog