The week between Christmas and January 1st was exceptionally slow this year (I was the only one in the building most days) so I was thinking a lot about found tools and new uses from the office over 2022. Clockwise from the top…
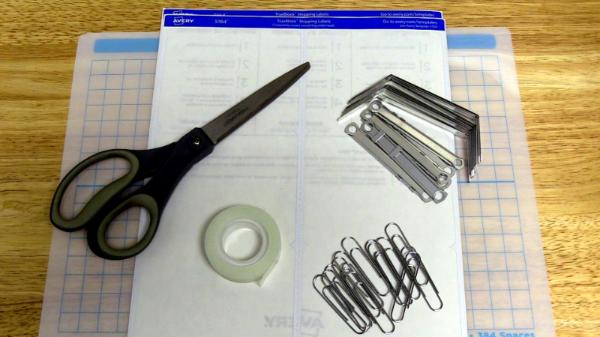
First up are mailing labels, specifically the backing paper. The non-stick coating can be used for some paint / pigment techniques but what I find it perfect for is mounting magnets. Unless you are using an accelerator, I have not found that any superglues bind to the label backing paper within a few minutes so it is perfect for any glue overspills from flush mounting magnets on waterline bases. My usual setup is a large steel sheet with the paper taped on top; I fill the recess in the model with a green stuff / superglue mix, place the magnet in, and immediately press it down onto the steel and paper. The magnet is attracted perfectly parallel to the flat steel while the glue sets so I do not have to worry about the depth of the drill out or any imperfections in the model base. Repeat as needed, and all of the magnets in that base should be oriented exactly level in relation to each other.
Next are the 2 hole paper file fasteners. Usually these are less than .2 mm in thickness and relatively hard steel which makes them perfect for sculpting thin lines into green stuff or to provide a quick outline if bent into shape using needle pliers before using as a press die. What I use them most for though is for any magnetic connection points that are in concave areas. If you cannot risk two magnets de-bonding within a large model and there is not enough room in the pieces to allow one to be replaced with a bar or screw, I use tin snips to cut a small square of steel and place within that joint. Magnet A binds to the square along with magnet B with the same force as what they would have with straight contact as far as I can tell. But with the square center, any drops or jars should only dislodge either magnet from the steel instead of potentially breaking its glue connection with the model component.
After that are some more small steel pieces, paper clips. They can be used as pins for models, or as aerials, but I prefer softer floral wire for both. What I have started using them for is as a frame or jig to hold pieces into place while waiting for glue to set, specifically epoxies. Paper clips hold their shape very well after being bent so you can position them to hold pieces in any orientation you want and then leave them on a table to dry. I have broken resin pieces and had metal components cut into resin while using rubber bands since there are not many realistic ways to control their tension. Placing paper towels or foam between the model and the rubber band as cushions really only introduces the possibility of having paper towel, foam, and / or bands being glued onto the model. But at the cost of one or two paper clips, you can have the pieces held in place by gravity with just the sides of the clips keeping them from shifting for however many hours the epoxy takes to set.
Regular tape is what have started keeping at the edge of my tray while assembling all through last year to keep things in place. Small pieces of plastic or resin are impossible to find if dropped, so I have started sticking them to a loop of tape after trimming or cleaning so they do not disappear before it is time for them to be attached. If you are using a lot of magnets, you could just stick cut pins to the stack as I used to, but now I am putting everything small and steel onto tape as well so nothing is unexpectedly magnetized and tries to cling to a tool.
And finally, the best and most useful repurposed office item I have found is the humble pair of scissors. The only tool from Citadel modeling that was ever worth its price was the mold-line scraper. Perfect 1/16 inch hardened steel with 90 degree angles that defeated every mold slip on plastic or resin, the mold-line scraper deserved every praise it got… until I accidently mailed mine across the country. I never bought a second one, and I am glad I didn’t because I then discovered that most scissors are also basically the same width, and basically the same steel, and also have an additional pair of angles to use from their cutting edges besides the 90 degrees you get at the back of each blade. The one drawback is that scissors do have convex rounds edges at their ends like the Citadel scraper had, but no concave recesses; but then again, scissors are far cheaper and much easier to cut with than scrapers. (150)
Hope some of these help with future modeling projects!

