
DISCLAIMER: The information in this post is intended to assist former customers of the now-defunct Corsec Engineering with constructing stands and model adapters that are compatible with the Omni-Stand system for their own personal use. I make no claims to any ownership to the Omni-Stand system or related products.

Years ago, probably close to a decade now, I found out about the Omni-Stand system from Corsec Engineering. This system provided exactly what I was looking for in a flying stand system for both my space miniature games and for games with aircraft models, such as Dystopian Wars; it provided a rock-solid and secure stand for my models, but could also be detached from the model and disassembled to lay completely flat when not in use. This was a critical consideration for me, as I am often taking my games “on the road” to game stores, conventions, and the like. However, in 2019 Corsec’s founder, Jonathan Bowen, announced that he was going to be shutting down production of the Omni-Stand, and in 2020 he tragically passed away. While I was lucky enough to have a decent supply of Omni-Stands and model adapters, I knew that sooner or later I would start running low, and so I’ve been researching ways to come up with my own replacements that are also compatible. Here is what I came up with!
First Step: Figuring Out the Threads
The place where I started was figuring out what sized threads were used for the stands. To aid me in that, I took one of my Omni-Stand posts to my local Home Depot. In the hardware aisle, there is a “thread checker,” a small display that allows you to check thread sizes on bolts and nuts you bring with you. From there, I was able to determine that the thread size used is #6-32. I picked up a small package of hex nuts in this size, as they can be used as adapters by gluing them to bases or to the underside of a model. However, I was more interested in trying to find how the bases, with their metal adapters which were imbedded into the acrylic, were made.
Second Step: Thermal Inserts
What I discovered is that there is a whole industry dedicated to providing threaded inserts that are designed to allow for sturdy threaded connections between pieces of acyrlic or other soft plastic materials. The basic process for installing one of these insertes is to drill a hole in the material, heat up the metal insert, and then press it into the acrylic. The plastic melts as the metal part is pushed into it, and when it cools it hardens around the insert and locks it securely in place. This short YouTube video shows an example of this process:
Now that I had a good feel for the basic method being used, I ordered a batch of inserts with the correct threads off of Amazon.
Step 3: The Prototype
Once my inserts arrived, I started experimenting. I have a large stock of the old standard acrylic flight stands that Spartan included with their models, as I never used them (in favor of adapting my models to the Omni-Stand system). So, I started off by taking a few bases, drilling a few different holes, and then attempting to press my inserts into them. Through a little trial and error, I was able to figure out that I needed a 3/16″ hole for the particular adapters I purchased. It’s important to note, however, that if I end up getting a different kind of insert down the road I might very well need to go with a different sized hole to ensure a good fit. To insert them into my bases, I used a soldering iron set at 15W to apply pressure to the insert. The iron gradually heats up the insert, which then softens the acrylic enough to allow the insert to melt into it. This video is a bit longer, but shows this process in a bit more detail. Of note, while there are special soldering iron tips available for this task, I was able to use a standard pointed tip in mine with no trouble.
Step 4: First Application
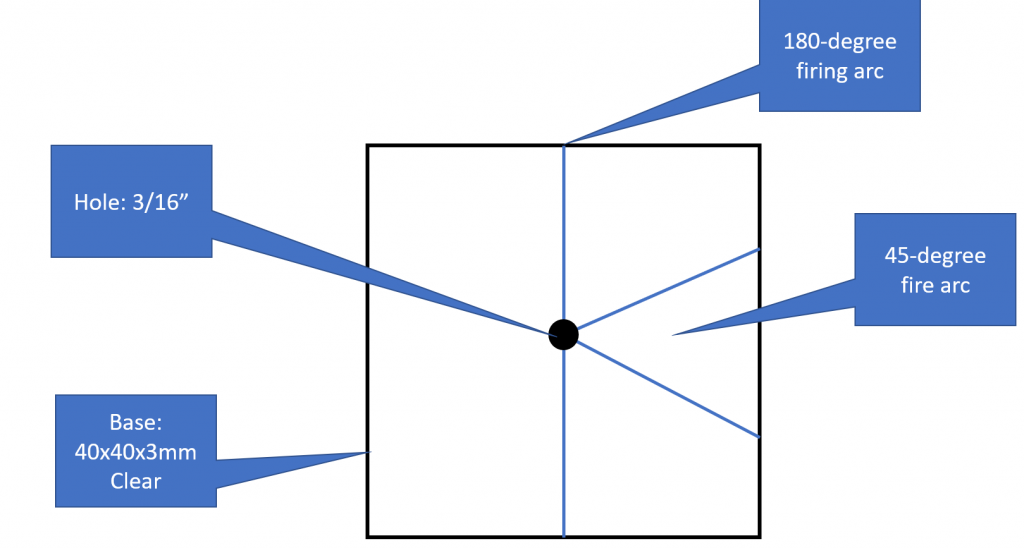
My first implementation of these methods was for a batch of bases for the game A Billion Suns. This game uses some rather unique firing arcs; a forward 45 degree arc, and a forward 180 degree arc. Since all of my existing bases had 90 degree arcs on them, this felt like a logical place to start. I sourced the acrylic bases from Litko Aerosystems, which were able to etch the firing arcs into 40x40x3mm square bases, as well as laser-cut the 3/16″ hole into the center for me. Once I received the bases, it was a fairly easy matter to insert the adapters into the holes. Having had the chance to use them in a game, now, I am please to report that they worked quite well!
Side Note: Model Adapters
For many users of the Omni-Stand, the biggest long-term concern is less having correct bases for a game as it is having sufficient quantities of adapters to attach to models (which will then allow them to thread onto the stands). Here, there are lots of options. For me personally, I purchased a number of Corsec’s magnetic adapters, so I tend to use rare-earth magnets to attach my smaller ships to their stands instead of threaded adapters. Failing in that, just about any threaded #6-32 hardware can work. The hex nuts I got from Home Depot, for example, will do the job just fine. An alternative would be these self-clinching nuts that I found on Amazon.
Conclusion
After a few months of off-again and on-again work, I am reasonably happy that I’ve found a satisfactory solution to the “Omni-Stand Problem;” that is to say, of the issue of having bought into the Omni-Stand system over the years and now being faced with the inability to obtain more stands and adapters when my existing stock is depleted. By sharing this information here, my goal is to help other folks who bought into Corsec’s outstanding product over the last decade to also find ways to keep their existing stand collections and perhaps eventually add on to them.
Until next time!
Thank you for figuring this out. I have been working on building more posts myself.
The tubes I found are 3/16 x .014 aluminum tubing from K&S Metals Part #1111 for 36 inch long. They also have a copper tubing (part 9511 ) of the same dimensions for about 2x the cost.
The treaded part is 6/32 rod. I have found them in 1 and 3 foot lengths.
The o-rings are 3mm with a width of 1mm
https://www.amazon.com/gp/product/B07F33VBRK/ref=ppx_yo_dt_b_asin_title_o01_s00?ie=UTF8&psc=1
Thanks for the additional info! I’ve played around with making a few posts myself; the method I’ve used is a piece of 6/32 “all thread” of the appropriate length was epoxied into the tubing, with a bit of thread sticking out on each end.